How Long Before Exercising Again After Bulge in L5
Back injuries – an athlete's worst nightmare. Then much of human movement relies on the ability to both stabilize and fluidly movement your spine. What happens if you lot herniate a disc? You might be wondering, can I e'er elevator weights again? The short answer is yes, but showtime let'due south discuss what a herniated disc is, and so address how you can safely incorporate forcefulness training back into your workout program.
What Is A Herniated Disc?
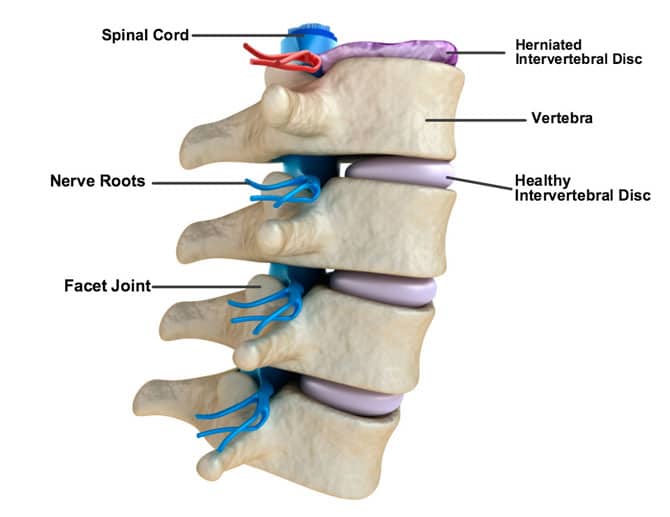
Disc herniations of the lumbar spine (L3-L4, L4-L5, L5-S1) are one of the more common back injuries. Between each vertebra in your spine is a vertebral disc. These vertebral discs serve as cushions between the vertebrae, and they assistance to absorb impact while also assisting the spinal facet joints to guide motion in the spine. Unfortunately, these discs can rupture and herniate. In some cases this can lead to pain and pressure level on your nerves, and besides cause symptoms in your dorsum that can radiate downward into your legs.
What Causes A Herniated Disc?
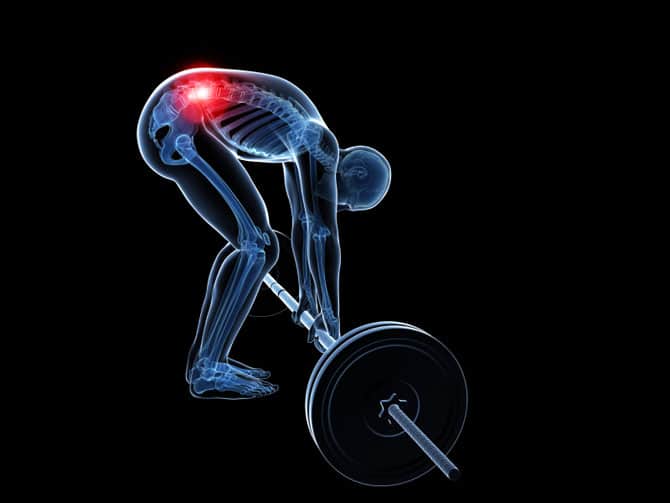
While symptoms tin come on of a sudden and acutely, disc pathology is commonly considered a long-term chronic condition. The last aggravating motion that acquired the acute bout of pain is often but the terminal movement of several times your back was stressed by poor movement mechanics. This is why lifting weights with proper form during all exercises is essential. Poor movement mechanics themselves are oftentimes not painful, but the repetition of poor movement (especially with heavy weights) can atomic number 82 to micro-trauma in the spine that cumulatively adds up and consequence in injury.
Degenerative disc disease and herniations are associated with increased lumbar spine mobility, especially excessive flexion and rotation. In other words, the more your spine moves out of its neutral position during exercise, the greater risk you're at for experiencing a disc trouble ane two.
Disc Herniation Symptoms
Symptoms may vary slightly, but generally consist of hurting or decreased sensation in the back, buttocks, thigh, and calf. People may also have some numbness or tingling, in add-on to muscle weakness, in the body part served past the afflicted nerves.
If you practise experience weakness, information technology is more often than not recommended that yous see a wellness practitioner. Your health practitioner should be able to tell which segment of your spine is near likely affected based on the exact location of your symptoms.
Tests To Identify A Lumbar Disc Problem
In addition to noting where your symptoms are, your wellness practitioner should as well perform:
1. A full neurological examination, which includes a screen of isolated muscles, sensations, and reflexes.
two. Nerve tension tests, usually a straight leg raise examination or the crossed direct leg raise exam.
Only if your health practitioner is non able to identify what is going on, would I recommend imaging tests such as MRI. While MRIs can be helpful, keep in listen that they are expensive, and often unnecessary in treating disc herniations.
How to Start Lifting Weights Again After A Herniated Disc
Fortunately, the best affair you can do to improve your herniated disc is to practise!
Do is not but recommended, it'south required to help retrain the muscles in your back.3 More specifically, spinal stabilization exercises help more than a full general practice program.iv
The exercises you perform will depend on how you lot feel and how long information technology's been since you've injured your back. Here'southward a 3-phase breakdown of how to reincorporate strength training after herniating a disc.
Prior to Exercise – Control the Pain
Prior to exercising, you'll want to minimize the hurting that you experience. For most people with herniated discs, lightly extending the back tin help to reposition the discs anteriorly.
Try laying prone on your elbows to run across if it alleviates your pain (like sphinx pose in yoga). It'southward important to relax and exhale commonly. If this position feels expert, yous can even straighten your arms into the prone press up (arms straight, back relaxed and curved).
At this stage, consider modalities (such equally electrical stimulation) and merely very lite movements to maintain blood flow and to command hurting. Returning to low-cal activity can actually speed up your recovery, since light loads can speed up the early healing process. That being said, you must exist conscientious not to push yourself to hard too shortly. Heavy loads accept been shown to have the opposite effect, decreasing claret menstruation in the spine and possibly impairing proteoglycan synthesis, which is disquisitional for the normal function of your discs.
Showtime with walking, and gradually incorporate the following exercises in phase guild.
Phase one: Acute Inflammatory Phase
This stage is usually started in the start two weeks, after local back hurting is controlled and minimized. At this point, your pain should not become worse with any of these exercises. The focus here is to begin reloading your spine with lite activity, and to relearn how to motion properly. When your body experiences hurting, your proprioceptive abilities are decreased (meaning you take less control of your body position than normal).
The post-obit exercises focus on keeping your spine in a neutral position at all times. The focus is movement reeducation and core stability.
Exercise #ane: Deadbug
Go along the small-scale, neutral curve of your dorsum (you may place a minor folded towel underneath your low-back to help you feel and maintain this position). Practice lifting your legs off the flooring while maintaining complete stability of your spine. Your low-back particularly should non lift abroad from the towel. You should experience your abdominals engage and tighten to prevent your pelvis from moving. Progress to the full movement, extending one arm and the opposite leg.
Agree for v seconds, and then switch sides. Outset with 3 sets of 30s. Work upward to performing deadbug for 2 minutes directly.
Exercise #two: Bird Dog
Similar to the deadbug do, bird dog involves extending i arm and the opposite leg without moving your spine or rotating your hips. Lifting opposite arm and leg off the ground while maintaining your balance will claiming and stimulate the diagonally-oriented muscles (multifidus, rotatores), which is exactly what you want when recovering from a herniated disc.
You should be able to perform this do without any movement of your spine. Try this with a cream roller (or rolled upwardly towel) balanced on your back. You'll know you've "cheated" if the roller or towel falls off your back. Endeavour to hold your balance on each side for five seconds before switching, and perform for 2 min directly.
Exercise #three: Hip Hinge
Especially if you want to render to weight lifting, it's imperative that yous practice moving and bending from your hips without movement in your lumbar spine. If you're not sure if you're keeping your spine neutral, try putting a piece of tape forth your low back or holding a dowel against your head, upper back, and tailbone.
When standing straight upward, you should take a slight curve in your low-back. If yous bend your back at all while doing the hip hinge, you'll either feel the tape pull or lose the dowel from one of these three points of contact. Your goal, peculiarly when y'all elevator weights, is to move from your hips, and non from your spine.
Outset, perform the hip swivel in the quadruped position. Once you've mastered that, do a standing hip hinge.
It's critical that you understand how to motility from your hips while stabilizing your spine before returning to bodyweight (or loaded) squats, deadlifts, and rows.
Stage two: Basic Stabilization & Repair Phase
This phase will last about 2 to 4 weeks, and your focus in on movement control and spinal stability using anti-rotation exercises.
At this point, your torso is in what we telephone call the "repair phase". Every bit it'southward healing, you'll desire to increase the challenge to the diagonally-oriented muscles in your spine (external & internal obliques and multifidus, all in combination with the transverse abdominus). Here, you volition starting time to add together weight to claiming your stability.
Exercise #iv: Side Planks
This is a great cadre practise to incorporate early on on as information technology challenges your obliques without excessively compressing the spine.
First, perform side plank with your knees bent prior. Progress to straight legs. Hold side plank for 10 seconds, with but 3 seconds of rest, for a total of 10 reps. As yous go stronger, outset combining the holds until yous can do this for 100 seconds straight on each side.
Exercise #5: Push-Pull Exercise (aka Paloff Press)
This helps to challenge the rotational stability of your spine. You'll need a cable or rubberband tubing for resistance.
Start with property the cable at your stomach. Stand tall with your core tight. As yous push your arms straight out in front of you, you'll feel the resistance try to pull you sideways. Maintain command and resist the side pull, keeping your hips and shoulders square. Agree for 5 seconds, and so slowly bring your hands dorsum towards your stomach. Repeat 10x. Once this gets easier, increase the tension past standing farther away, using a stronger resistance ring, or increasing the weight.
Bonus Tip: You can change the height of the anchor point to emphasize the challenge on your anterior muscles (abdominals), or your back muscles. If you want to challenge the abdominals more, place the anchor bespeak around shoulder-superlative. If y'all want to claiming your back more, place the anchor height below your pelvis.
Do #6: Unilateral Press & Unilateral Row
The 2nd half of this stage involves performing many of your normal exercises, but on one side at a fourth dimension. Perform lighter loads of your traditional exercise routine, and alter to do them unilaterally.
Incorporate these two common exercises, but perform them on one hand at a time. You lot should feel parts of your trunk (your core and spinal stabilizers) engage differently (and more) than if you lot were to do these exercises with both artillery simultaneously.
Phase 3: Strengthening and Rotation
At this point, at that place should be no pain. You've spent the last few weeks strengthening your core and then that your trunk tin can maintain stability and resist rotation and flexion nether load. The concluding step earlier returning to sports training and college-level movements is to railroad train your spine to rotate without flexing or extending.
Exercise #7 – Chops & Lifts
At present you're going to rotate your spine while maintaining core control. First, perform chops and lifts focusing only on rotation through your spine. Then, make these exercises more full-body by pivoting and rotating your feet and hips as well. Just as in the push-pull exercise, yous can change the anchor point to challenge different parts of your cadre. Brand sure to non flex or extend your spine.
If you follow this 3-phase approach, you'll train your trunk to exist stronger, more than stable, and more than injury-resistant. You'll allow the disc to heal and retrain the surrounding muscles to protect it. A disc herniation doesn't have derail your strength and fitness goals. With strategic training, you tin can return to weight lifting like deadlifts, squats, and kettlebell swings, probably with improve grade and control than before.
How Long Before Exercising Again After Bulge in L5
Source: https://www.builtlean.com/herniated-disc-weight-lifting/